This page and What is NAT provide a general explanation of reachability issues, if you just want to fix them, have a look at NAT problem
Contents[hide] |
[edit] Yellow Smileys
Smiley faces (Torrent Health icons) provide info on your torrents. The yellow smiley  indicates that while your system can initiate connections with other peers (known as local connections, or L in the torrent's Details page, Peers tab, you cannot receive connections initiated from other peers (known as remote connections, or R). This is almost certainly caused by incorrectly forwarded ports from your router or firewall. You can see the L's and R's in the Details tab of your individual torrent. If you see only L's, you probably have a Port Forwarding problem. Green smileys
  mean that you have both L and R connections to peers and are connected to the tracker. For more information on what every smiley means, click Help > About Health.
There are other possible causes for a yellow smiley. If you see a green smiley or have seen one with the same router/firewall configuration, then port forwarding may not be the culprit. Run the Help > NAT/Firewall test.
Make also sure that you have allowed "Incoming connection" as a peer source in Connection options. Disabling the optios tells Vuze to discard connections attempts from other bittorrent users, and then you would not be reachable any more.
[edit] Ports
When you connect to the internet, there are different channels that data travels by. Computers usually handle this perfectly in the background via ports, identified by numbers. For example, MSN protocol usually uses ports 6891-6900. Please see Select port for Vuze for information on which ports to use. Check out Tantalo , the official IANA port list or Wikipedia to find out more about ports.
Azureus listens to one port for torrents (defined in Connection options) and another for the embedded tracker. Two protocols, TCP and UDP, use the same port, unless specified otherwise. Thus, you need to forward one listening port for Azureus and tick both the TCP and the UDP boxes, or make an extra rule, one for each protocol.
The only time you will notice the ports is when they are closed; no data is transmitted and you get error messages like "NAT Error." This usually happen because of firewalls and routers.
Note: When you initiate the outgoing connection yourself (e.g. with web browsing), the router automatically configures a temporary forwarding for the random port that your web browser uses for that connection. But programs like Vuze, which can also accept incoming connections from others, the router does not automatically know the right port forwarding.
[edit] NAT
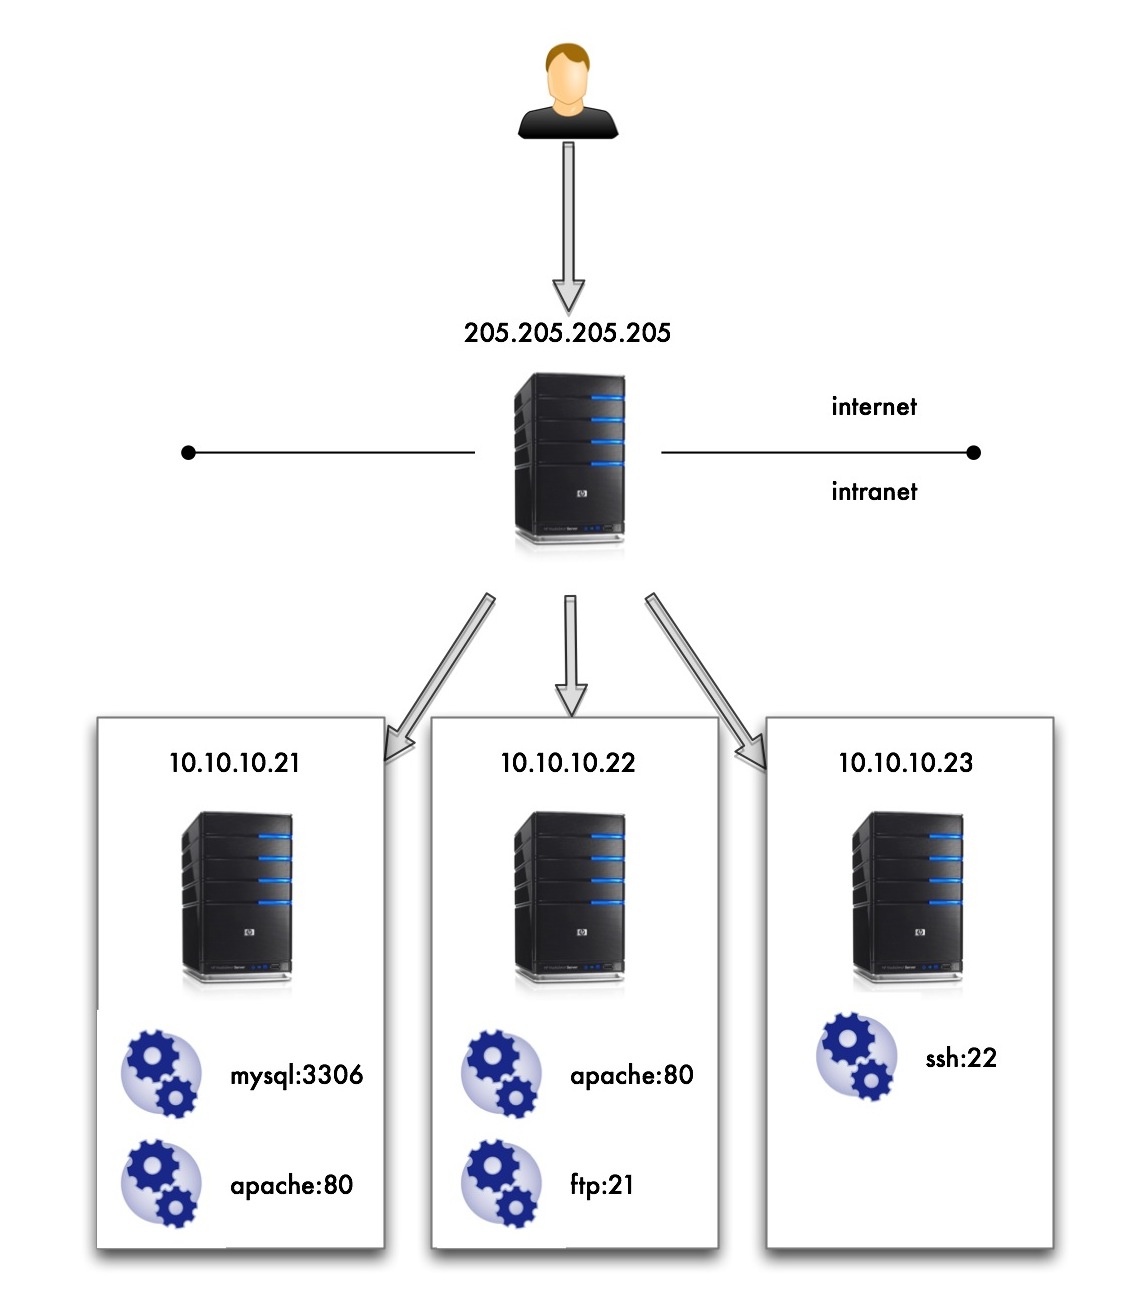
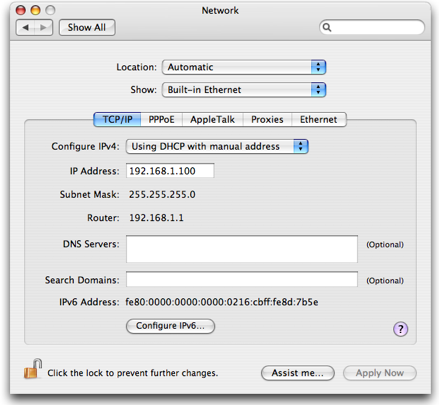
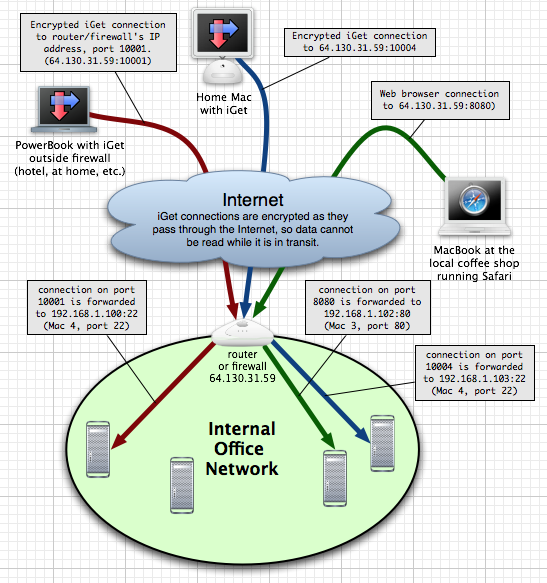
NAT stands for Network Address Translation. The network, which includes your router and computer, needs to translate the Internet Protocol address of your router (with its own IP address) to and from the IP address of your computer (with its own IP address). The router directs traffic to different computers connected to it and can be configured to protect you from specified traffic. It can use port forwarding to redirect data packets to a different address. The address known by the outside world (Wider Area Network, or WAN) is the IP address of your router, which redirects packets according to your instructions to your Local Area Network (LAN) address, or the local IP address of your computer.

Vuze has built-in NAT testing logic. When you get the "NAT Error," your modem/router is not set up correctly. This is generally due to your router not forwarding the proper ports. You may read more advice on how to configure port fowarding on the NAT problem page. What is NAT may help too.
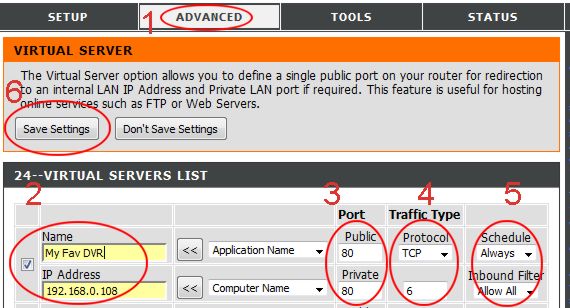
[edit] Double router port forwarding
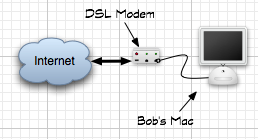
If you have both a smart NATting modem and a NATting router/basestation, or two NAT routers, you may need to configure port forwarding in both of them. You need to set port forwarding at each router all the way from "public internet" upto your PC, always setting the forward to the next device inwards (from smart modem to router, and from router to PC). See an explanation here: http://www.portforward.com/help/doublerouterportforwarding.htm
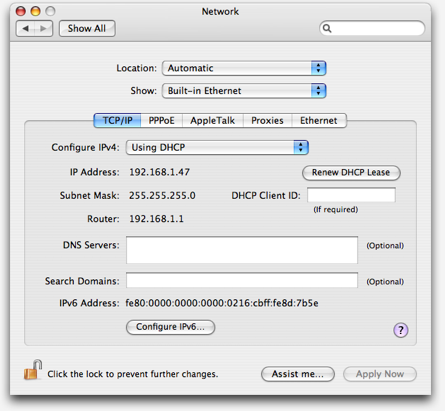
A clear sign of the need for double router port forwarding is if your router has a private IP address also on its WAN/ADSL/internet side (whatever it is called in router status/config screens). "Private" IP address ranges are 10.x.x.x, 172.x.x.x and 192.168.x.x, and IP addresses inside those areas are different from other addresses, as they can not be reached from outside without port forwarding.

[edit] Mobile/3G/satellite connections
Very often the various mobile internet connections, either through 3G/mobile dongles or satellite dishes, have been limited by the ISPs network architecture to only have private IP addresses.
If your "outermost" device, e.g. the 3G modem, has a private IP address (10.x.x.x, 172.16-31.x.x and 192.168.x.x) in its config/status screens as WAN/internet address, then it has been given by ISP's network and there isn't much you can do. As you have no config access to ISPs routers, you might have to live with the yellow smileys and the NAT problem.
- Note: Vuze NAT test will not find this out, as it will always show the first real public IP address it reaches. In the case of mobile dongles with private addresses, the shown IP address is probably a router somewhere at the ISP.