Bob runs a small custom office furniture company which builds awesome desks, workstations, filing cabinets and shelving. The company designs to suit, and this involves sending representatives to the offices of customers and potential customers for on-site visits.
In the early days, Bob did a lot of that running around himself, but as his business grew more successful, he was able to delegate most of that work and spend his time doing what he loves—designing unusual furniture solutions.
Bob and his three assistants are constantly churning out potential designs, and his field representatives need to be able to get his latest illustrations, floorplans, and 3D models, as well as marketing and and other documents. They need access to this stuff whenever the need arises, often when they're out of the office.
With iGet, that's easy. Bob doesn't have to train his staff how to use it, because the interface is intuitive and obvious. He doesn't have to worry about miscreants snooping on his data, because iGet uses always-on industrial-strength encryption. The only slightly tricky bit was setting up his Internet connection.
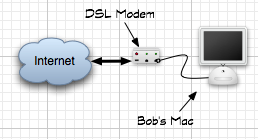
To share his Internet connection with all the Macs in his office, Bob ordered a router from his ISP. He could have instead bought a router at his local computer store, or ordered an Airport base station from Apple.
The precise details of configuring port forwarding differ for each router, but the basic concepts do not.
Please note: We are currently in the process of updating these tutorials to cover the new iGet Mobile, as well as iGet. Most of the concepts are the same, so this tutorial may be useful in its current form. However, iGet always uses port 22, whereas iGet Mobile uses the port you specify (the default is 55555). So, when using these tutorials, iGet Mobile users should replace port 22 with whatever port iGet Mobile is configured to use.
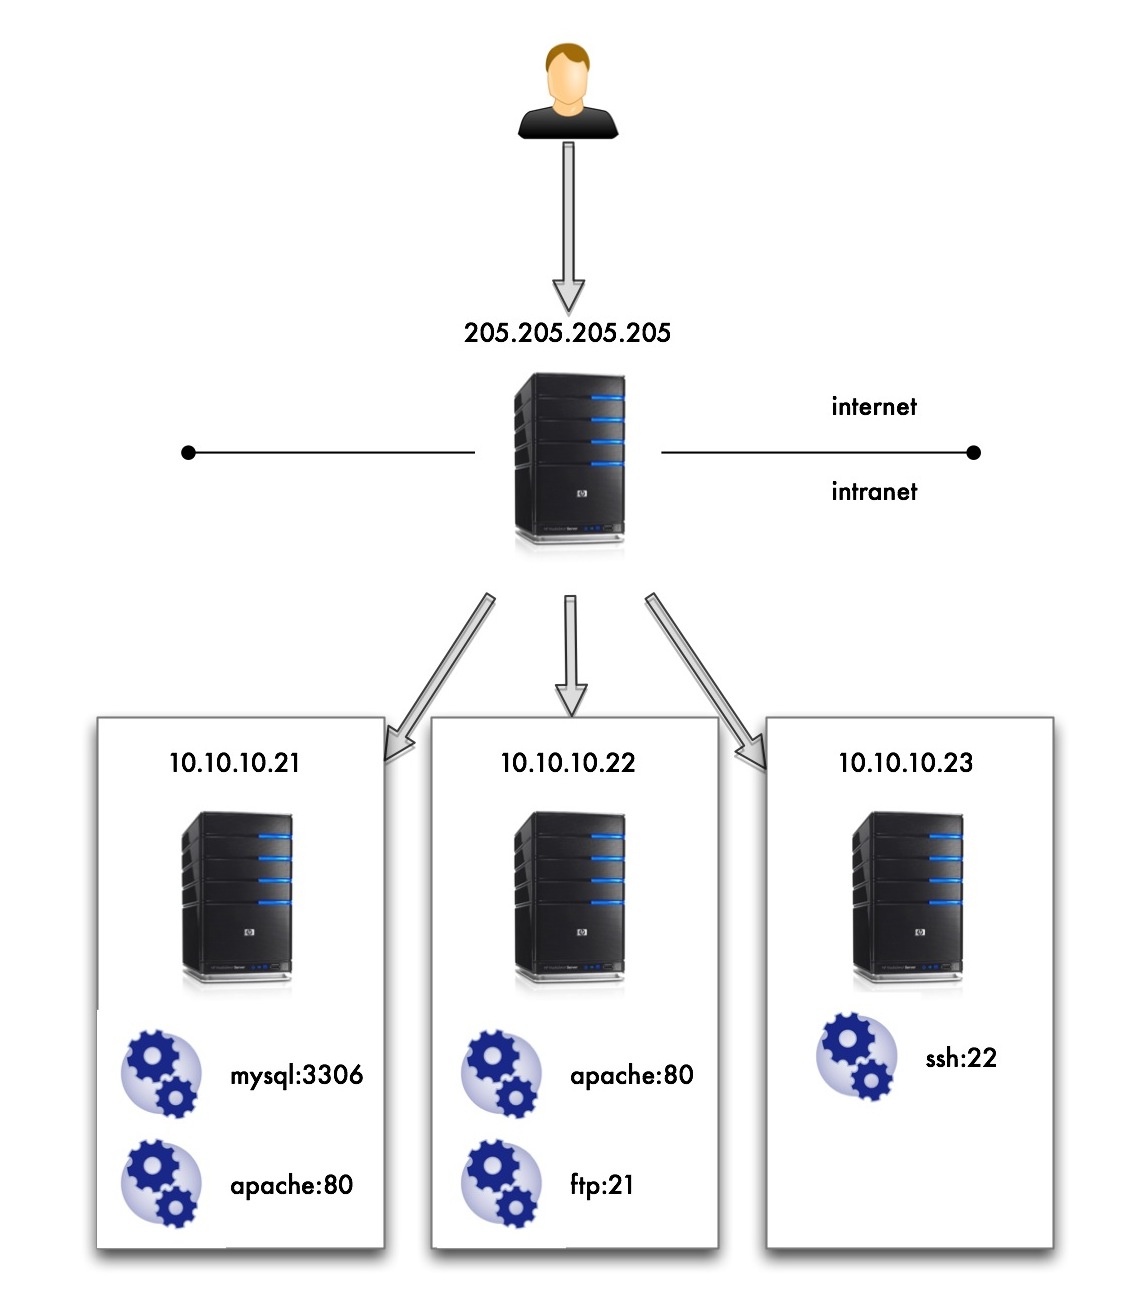
Bob's IP address is now assigned to his router. When somebody tries to connect from the to his IP address, the router looks at the connection and decides what computer to forward the connection to. To the user, this process makes it seem that they are connecting directly to that computer.
Bob has four Macs in the office. He wants his router to be able to forward his connection to the Mac of his choice, so that he can access whichever Mac he wants. But he has only the single IP address, so every incoming connection is connecting to the same address. How can the router tell which Mac he wants to connect to?
The router figures out which Mac he wants by looking at the
port number. Every Internet connection involves an IP address, and also a port number. The port number indicates the type of service being requested. For example, standard HTTP connections made by Safari use port 80, the standard port number for web servers. iGet uses port 22, the standard port for SSH connections.
Normally, most software doesn't make you deal with the port number. For example, you don't have to specify port 80 when using your web browser, because it uses that port by default. But you
can specify the port in your web browser. To do so, you append a colon and the port number after the hostname or IP address.
iGet works the same way. To tell iGet to connect using a different port number than it normally would, you append a colon and the port number.
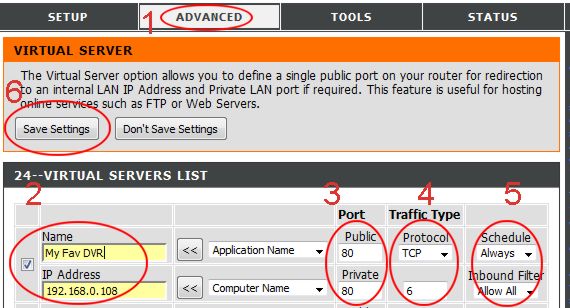
Bob is going to set up port forwarding for iGet, and while he is at it, he's going to set up port forwarding so that he can view the test web site one of his employees is creating on one of the Macs. To set this all up, he does the following:
1. Decide which port numbers will point to each Mac.
This is an arbitrary decision, and the numbers can pretty much be any valid port numbers. However, Bob has read up a little bit on the web, and he's learned that is better to use port numbers above 1024 (to avoid conflicting with other services that might be in use now or someday in the future). So he chooses 10000 as his starting number. He jots his choices down on a post-it note:
- port 10001 goes to iGet on Mac #1
- port 10002 goes to iGet on Mac #2
- port 10003 goes to iGet on Mac #3
- port 10004 goes to iGet on Mac #4
- port 8080 goes to the test web server on Mac # 3
2. Figure out what port numbers to translate these to.
Bob will configure the router to accept connections on these non-standard port numbers that he just made up. But his Macs will expect the connections to come on the standard port. Bob doesn't want to (and doesn't know how to) tweak his Macs to listen for connections on these non-default port numbers.
Fortunately, his router will take care of that for him. When it accepts a connection on one of these weird port numbers, it will not only figure out which Mac to forward the connection to, but it will also change the port number. This way, the Mac will see the incoming connection as if it was coming on the default port. Bob has to configure his router so that it knows how to do this. He knows that the web server listens for connections on port 80, and the Mac's SSH subsystem that iGet uses listens for connections on port 22. So he fleshes out his note:
- 64.130.31.59:10001 -> port 22 (iGet) on Mac #1
- 164.130.31.59:10002 -> port 22 (iGet) on Mac #2
- 64.130.31.59:10003 -> port 22 (iGet) on Mac #3
- 64.130.31.59:10004 -> port 22 (iGet) on Mac #4
- 64.130.31.59:8080 -> port 80 (web server) on Mac # 3
3. Give all the Macs static (unchanging) private IP addresses on the LAN.
By default, Bob's router automatically assigns private IP addresses to all his Macs. It gives the first Mac 192.168.1.10, the next one 192.168.1.11, and so on. That's convenient, but it means that each Mac's address on the local network may change from time to time.
Bob wants to make sure nothing ever changes, so he decides to give each Mac its own, unchanging private IP address. He uses the Network pane in each Mac's System Preferences application to hardcode the IP address.
First, he goes to the Network preferences pane, then selects "Built-in Ethernet" from the "Show" popup menu. This shows the detailed settings for his Ethernet network connection. (He would change his AirPort settings instead if his Mac were connected wirelessly, but it isn't.)
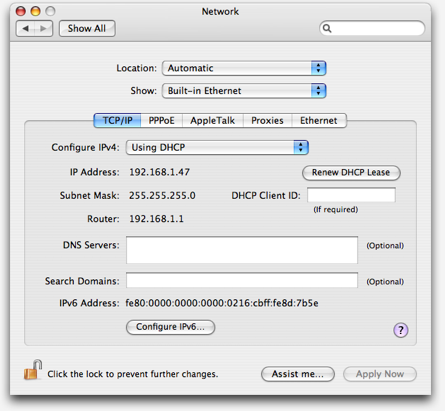 Bob's original (default) Network preferences.
 The only change he wants to make is to specify an address manually. To do that, he makes only one change: instead of "Using DHCP" in the first popup menu, he selects "Using DHCP with manual address"
Once he does this, the "IP Address" becomes editable. But the address is now "0.0.0.0", which won't work. What address should he put? Unsure, he calls his son, Jason.
"Copy the address that it shows for your router, but change the last part of the IP address," says Jason. "Start at 100, and then make the next Mac's 101, and so on. That almost always works. "
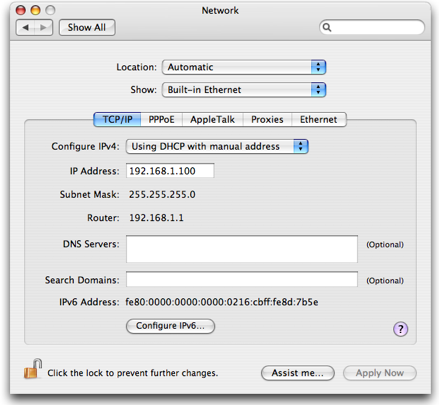 Bob's modified Network preferences on the first Mac.
 Now that Bob has given each Mac in his office its own static local IP address, he can finish his port forwarding note:
- Public IP Address:Port -> Local IP Address:Port
- 64.130.31.59:10001 -> 192.168.1.100:22
- 64.130.31.59:10002 -> 192.168.1.101:22
- 64.130.31.59:10003 -> 192.168.1.103:22
- 64.130.31.59:10004 -> 192.168.1.104:22
- 64.130.31.59:8080 -> 192.168.1.103:80
Or, spelled out more precisely:
| Public IP Address | Port Number | | Private LAN IP Address | Port Number |
| 64.130.31.59 | 10001 | forwarded to | 192.168.1.100 | 22 |
| 64.130.31.59 | 10002 | forwarded to | 192.168.1.101 | 22 |
| 64.130.31.59 | 10003 | forwarded to | 192.168.1.102 | 22 |
| 64.130.31.59 | 10004 | forwarded to | 192.168.1.104 | 22 |
| 64.130.31.59 | 8080 | forwarded to | 192.168.1.102 | 80 |
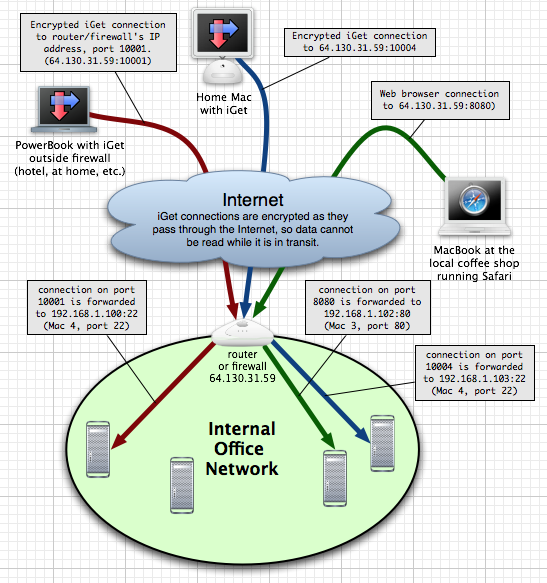
Finally, just to make sure he has everything straight in his mind, Bob fires up OmniGraffle and whips up little diagram to visualize how the port forwarding should work:
4. Reboot everything
While not strictly necessary, Bob wants to make sure everything is configured right and will survive a reboot. If he reboots his DSL modem, router, and Mac, and can still connect, then he can be confident he didn't make any errors while configuring all the parts.
So, he reboots his gear, grabs his MacBook and walks to a nearby cafe. Using the cafe's wireless Internet connection, he opens safari and enters his static IP address, a colon, and the custom port number he uses for his test web server:
Sure, enough, he sees that his test web site loads up. The web server is running on Mac #3 back in his office; by appending the port number 8080 to the address in Safari, he has told his router "Forward this connection to Mac #3 on port 80"
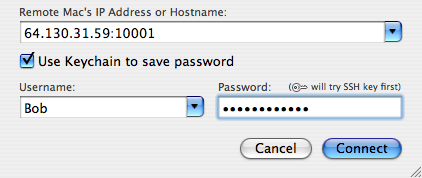
Next he fires up iGet, and tries the same trick:
Success! iGet connects and browses the files on his first Mac. Using address "64.130.31.59:10002", he connects to the next Mac, and so on. His employees can access their files, and Bob can get back to working on his latest ergonomic switchable sit/stand computer workstation.


")